
Beginning Crochet Tutorials ─ YouTube: A Comprehensive Plan
Embark on your crochet journey! This plan leverages YouTube for learning. Start with foundational stitches – chain, single, half double, and double crochet – using light-colored acrylic yarn.
Explore resources like Club Crochet and various tutorial playlists for guided instruction.
Welcome to the world of crochet! Today, December 4th, 2025, marks the perfect starting point for your crafting adventure. Crochet is a wonderfully versatile hobby, offering relaxation and the satisfaction of creating beautiful, handmade items. Fortunately, a wealth of free instruction is readily available on YouTube, making it incredibly accessible for beginners.
This comprehensive plan focuses on utilizing YouTube tutorials to build a solid foundation in crochet. We’ll begin with the most basic stitches, progressing at a comfortable pace. Don’t be intimidated by the terminology; we’ll cover US versus UK terms later. The key is consistent practice and utilizing the visual learning offered by video tutorials.

Several excellent YouTube channels cater specifically to beginners. Resources like Club Crochet provide clear, step-by-step instructions. Individual tutorials, such as those linked, offer focused lessons on specific techniques. Remember to choose tutorials that use US terminology for consistency. Embrace the learning process, and don’t hesitate to pause, rewind, and practice each stitch until you feel confident. Ravelry is also a great resource for free patterns once you’ve mastered the basics!
II. Essential Materials for Beginners
Getting started requires minimal investment! To begin your crochet journey, you’ll need just a few key supplies. Yarn is, of course, essential. For beginners, a light-colored acrylic yarn like Caron One Pound is highly recommended. It’s affordable, readily available, and forgiving – easy to unravel if mistakes are made. Avoid dark colors initially, as stitch definition is harder to see.
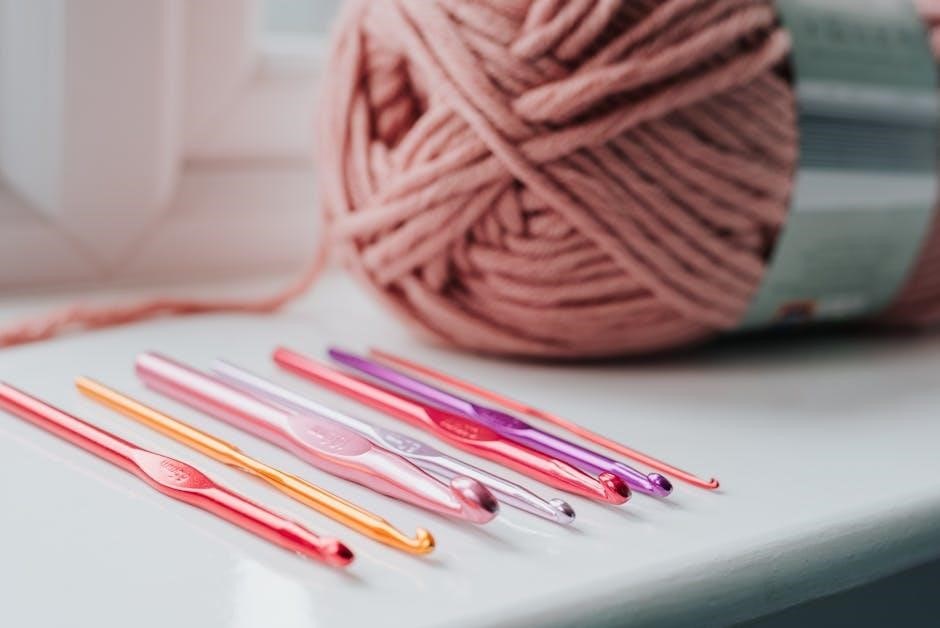
Next, you’ll need a crochet hook. A size 5 hook is a good starting point, but always check the yarn label for the manufacturer’s recommendation. Consider investing in an ergonomic hook to reduce hand fatigue, especially during longer projects. An Amazon kit provides a variety of sizes and helpful accessories like stitch markers.
Stitch markers are invaluable for keeping track of rows and stitch counts. While the Amazon kit includes them, you can also purchase them separately. Finally, a pair of scissors for cutting yarn completes your basic toolkit. Remember, quality doesn’t have to be expensive – focus on functionality and comfort as you learn!
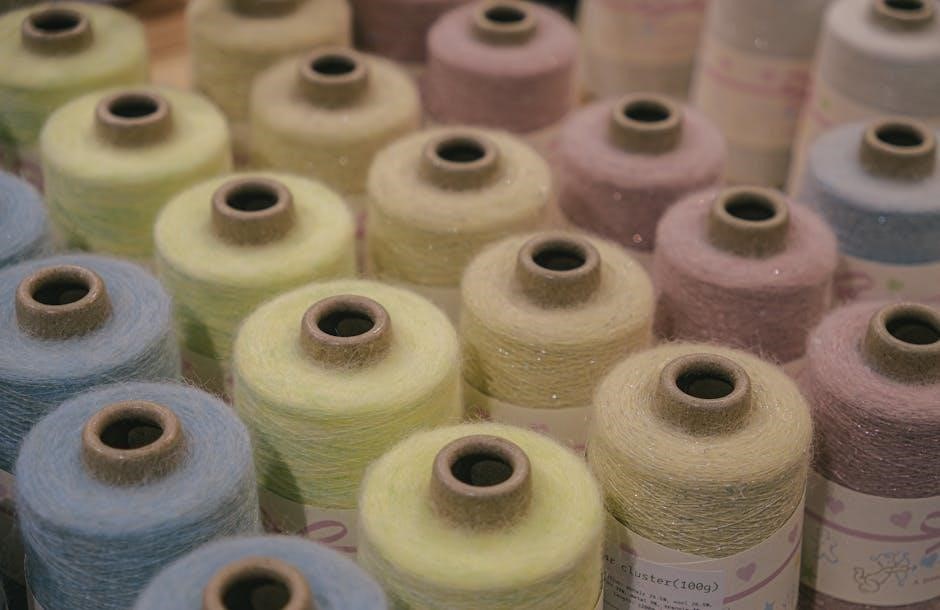
III. Yarn Selection: Light Colors & Acrylics
Choosing the right yarn is crucial for a positive first experience. For beginner crocheters, acrylic yarn is the ideal choice due to its affordability, durability, and ease of use. It’s readily available in a wide range of colors and weights, making it accessible for practice projects.
Specifically, opt for light-colored yarns. This allows you to clearly see your stitches, which is essential when learning new techniques. Avoid dark shades like black initially, as they can make it difficult to identify stitch definition and spot errors. Caron One Pound is a frequently recommended brand, known for its value and minimal splitting.
While Red Heart Super Saver is another option, Caron One Pound generally offers a smoother texture. Yarn weight 4 or 5 is a good starting point. Remember, a forgiving yarn is key – one that’s easy to unravel if you need to correct mistakes. Prioritize visibility and ease of handling over fancy fibers when you’re first starting out!
IV. Crochet Hook Choices: Ergonomic Options
Selecting a comfortable crochet hook is vital, especially for extended practice sessions. Beginner crocheters often underestimate the impact of hook ergonomics on hand fatigue and overall enjoyment. While standard hooks are available, ergonomic hooks are highly recommended.
These hooks feature cushioned grips designed to reduce strain on your hands and wrists. A size 5 hook is a good starting point, but always check the yarn label for the manufacturer’s recommended hook size. Consider investing in a hook kit, like the one available on Amazon (https://www.amazon.com/dp/B07NVDJJBL), to explore various sizes.
The light green kit mentioned offers a good variety and includes stitch markers. While some kit components cater to knitting and sewing, the range of hook sizes is invaluable. Prioritize comfort and grip; a hook that feels natural in your hand will significantly improve your crocheting experience. Don’t hesitate to experiment to find what works best for you!
V. Core Crochet Stitches ─ Foundational Skills

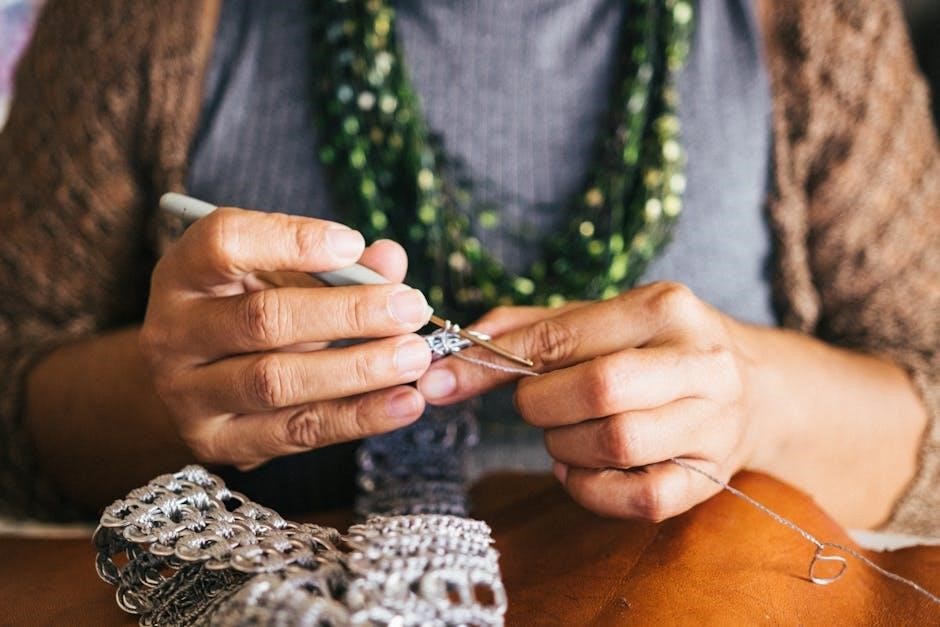
Mastering fundamental crochet stitches is the cornerstone of your learning journey. Begin with the chain stitch (ch), the very basis for most crochet projects. From there, progress to the single crochet (sc), a simple and versatile stitch perfect for building density and texture.
Next, tackle the half double crochet (hdc), offering a slightly taller stitch with a quicker working speed. The double crochet (dc) further accelerates your progress, creating a more open fabric. For added height and visual interest, explore the treble crochet (tr). Finally, don’t overlook the slip stitch (sl st), essential for joining rounds and finishing projects neatly.
Remember these are US terminology stitches. Numerous YouTube tutorials (like those from Club Crochet ― https://youtube.com/c/ClubCrochet) demonstrate each stitch clearly. Consistent practice of these core stitches will build muscle memory and confidence, setting a solid foundation for more complex patterns.
VI. Chain Stitch (ch) ― The Building Block
The chain stitch (ch) is undeniably the foundational element of crochet, serving as the starting point for most projects and often incorporated within stitch patterns. It’s created by pulling loops of yarn through other loops, forming a series of connected ‘v’ shapes.
YouTube is an excellent resource for visual learners. Search for “chain stitch tutorial” and you’ll find countless demonstrations. Pay close attention to maintaining consistent tension – not too tight, not too loose – as this impacts the overall appearance of your work.
Initially, practice making a chain of a specific length (e.g., 20 chains) repeatedly. This builds muscle memory and helps you gauge your tension. Remember, the first chain stitch doesn’t count as a stitch when following a pattern. Mastering this seemingly simple stitch is crucial; it’s the building block upon which all other crochet techniques are built. Resources like https://youtu.be/11iw-yBGm-k can be very helpful!
VII. Single Crochet (sc) ─ Basic Stitch Mastery

Once comfortable with the chain stitch, the single crochet (sc) is the next essential skill to master. It’s a short, dense stitch, perfect for creating sturdy fabrics and amigurumi projects. YouTube offers a wealth of tutorials demonstrating the single crochet technique.
The process involves inserting your hook into a chain stitch, yarn over, pull up a loop, yarn over, and pull through both loops on the hook. Repeat this process across each chain stitch to create a row. Maintaining consistent tension is key for a neat and even fabric.
Beginners often find it helpful to practice single crochet in rows, creating a small swatch. Pay attention to identifying the ‘v’s’ formed by the chain stitches – these are where you’ll insert your hook. Don’t be afraid to rip out your work and try again if it doesn’t look right; acrylic yarn is forgiving! Explore tutorials from channels like Club Crochet (https://youtube.com/c/ClubCrochet) for clear demonstrations.
VIII. Half Double Crochet (hdc) ― Intermediate Technique
Building upon the single crochet, the half double crochet (hdc) offers a slightly taller stitch, creating a fabric with more drape. It’s considered an intermediate technique, bridging the gap between the basic single crochet and the faster double crochet. YouTube tutorials are invaluable for visualizing this stitch.
To execute the hdc, yarn over, insert your hook into the stitch, yarn over, pull up a loop (you’ll have three loops on your hook), yarn over, and pull through all three loops. This creates a stitch that’s taller than sc but shorter than dc. Consistent tension remains crucial for a polished look.
Practice rows of hdc to get a feel for the stitch height and rhythm. Many beginners find it helpful to compare the hdc to the sc and dc to understand the differences. Channels offering clear, step-by-step guidance, like those linked previously (https://youtu.be/11iw-yBGm-k), can accelerate your learning. Don’t hesitate to pause and rewind as needed!
IX. Double Crochet (dc) ― Faster Stitching
The double crochet (dc) is a fundamental stitch known for its speed and height. It’s a significant step up in complexity from the half double crochet, creating a more open and airy fabric. YouTube provides excellent visual demonstrations to master this technique.
To perform a dc, yarn over, insert your hook into the stitch, yarn over, pull up a loop (three loops on the hook), yarn over, pull through the first two loops (two loops remain), yarn over, and pull through the remaining two loops. This creates a taller stitch, allowing projects to work up more quickly.
Beginners often benefit from practicing dc in rows, focusing on maintaining consistent tension. Compare the height of the dc to the sc and hdc to solidify your understanding. Utilize resources like https://youtube.com/playlist?listPLVfc07XdHHVx3Qiq9nyxthMFGN0UulG1L for detailed tutorials. Remember to count your stitches to ensure consistent width and avoid unintentional increases or decreases.
X. Treble Crochet (tr) ─ Creating Height & Texture
The treble crochet (tr), also known as triple crochet, is the tallest of the basic crochet stitches. It’s perfect for adding significant height and texture to your projects, creating openwork designs or quickly building up fabric. YouTube tutorials are invaluable for visualizing this stitch.
To execute a tr, yarn over twice, insert your hook into the stitch, yarn over, pull up a loop (four loops on the hook), yarn over, pull through the first two loops (three loops remain), yarn over, pull through the next two loops (two loops remain), and finally, yarn over and pull through the last two loops.
Practice makes perfect! Beginners should focus on maintaining even tension to create a uniform fabric. The treble crochet is ideal for borders, decorative elements, and projects where a looser, more dramatic texture is desired. Explore tutorials at https://youtu.be/aAxGTnVNJiE to refine your technique and gain confidence. Remember to count stitches diligently to maintain project shape.
XI. Slip Stitch (sl st) ― Joining & Finishing
The slip stitch (sl st) is a fundamental crochet technique used primarily for joining rounds, finishing off projects, or creating a neat edge. While it doesn’t add significant height to your work, its utility is immense. YouTube offers excellent visual guides for mastering this stitch.
To perform a slip stitch, insert your hook into the stitch, yarn over, and pull a loop through both the stitch and the loop already on your hook – completing the stitch in one motion. It’s a very flat stitch, often used to move across a row without adding height.
Slip stitches are crucial for creating seamless joins in amigurumi (crocheted toys) and for neatly finishing off your crochet pieces. They’re also used in edging to provide a clean, defined border. Resources like Club Crochet (https://youtube.com/c/ClubCrochet) demonstrate practical applications. Consistent practice will ensure a polished and professional finish to all your crochet endeavors.
XII. Understanding Crochet Terminology (US vs. UK)
Crochet patterns can be confusing for beginners, largely due to differing terminology between the United States (US) and the United Kingdom (UK). It’s vital to understand which system a pattern uses to avoid errors and frustration. YouTube tutorials often specify which terminology they employ.
The core difference lies in the names of several stitches. For example, what Americans call a “double crochet” (dc), the British refer to as a “treble crochet” (tr). Similarly, the US “single crochet” (sc) is the UK’s “double stitch” (ds). A US “half double crochet” (hdc) translates to a UK “half treble crochet” (htr).
Always check the pattern’s introduction or the YouTube video description to confirm the terminology. Many resources provide conversion charts. Being aware of these differences prevents misinterpreting instructions and ensures your project turns out as intended. Resources like the provided links (https://youtu.be/11iw-yBGm-k, https://youtu.be/aAxGTnVNJiE) will likely clarify these distinctions.
XIII. Amigurumi Specific Techniques
Amigurumi, the Japanese art of crocheting small, stuffed yarn creatures, requires specific techniques beyond basic stitches. YouTube is an excellent resource for mastering these skills. Key techniques include the invisible increase and decrease, crucial for creating seamless, well-shaped amigurumi.
Crocheting in continuous rounds, rather than joining each round, is standard practice in amigurumi to avoid visible seams. The “magic circle” (or magic ring) is the preferred method for starting amigurumi projects, allowing you to create a tightly closed center. YouTube tutorials demonstrate these techniques visually, making them easier to learn.
Focus on tutorials that emphasize neatness and stitch placement. Consistent tension is vital for a polished look; Explore channels offering amigurumi-specific patterns and guidance. Remember, practice is key! The information provided suggests focusing on these techniques for successful amigurumi creation, and YouTube provides ample visual learning opportunities.
XIV. Invisible Increase & Decrease for Seamless Amigurumi
Achieving a polished look in amigurumi hinges on seamless increases and decreases. Traditional increases and decreases can leave noticeable bumps, disrupting the smooth form of your creation. The invisible increase and invisible decrease techniques, readily demonstrated on YouTube, solve this problem.
The invisible increase involves working two stitches into the same stitch, but picking up the front loop only of the stitch below, effectively hiding the increase. Similarly, the invisible decrease involves working through the front loops only of two stitches, creating a nearly undetectable decrease.
YouTube tutorials will visually guide you through the process, showing the precise placement of your hook and yarn. Practice these techniques slowly at first, focusing on maintaining consistent tension. Mastering these skills will dramatically improve the quality and appearance of your amigurumi projects, resulting in a professional, seamless finish. Search for dedicated tutorials specifically labeled “invisible increase amigurumi” or “invisible decrease amigurumi” on YouTube.
XV. Crochet in Continuous Rounds ― Avoiding Seams
For seamless amigurumi, crocheting in continuous rounds is essential. Unlike working in separate rows and joining, continuous rounds mean you don’t create a visible seam. This technique is particularly important for spherical or cylindrical shapes, where seams would be highly noticeable.
YouTube tutorials demonstrate how to achieve this by simply not joining the last stitch of each round to the first stitch with a slip stitch. Instead, you continue working in a spiral, using a stitch marker to keep track of the beginning of each round. This method requires careful stitch counting to maintain the correct shape and size.
Many YouTube creators offer visual guides, showing how to move the stitch marker as you progress. While it may feel awkward initially, continuous rounds become intuitive with practice. This technique eliminates the need for weaving in ends from joining, streamlining your amigurumi process and resulting in a cleaner, more professional finish. Search “crochet continuous rounds amigurumi” on YouTube for detailed demonstrations.
XVI. The Magic Circle ― Starting Amigurumi Projects
The magic circle (also known as the magic ring) is a fundamental technique for starting amigurumi projects. It allows you to create a tightly closed center, essential for preventing stuffing from showing through. Unlike chaining a few stitches and joining, the magic circle creates a seamless beginning.
YouTube is an invaluable resource for learning this technique. Numerous tutorials visually demonstrate how to wrap the yarn, create the initial loop, and crochet the first round into the ring. The key is to pull the tail end of the yarn tightly after the first round to close the circle completely.
Search “magic circle crochet amigurumi” on YouTube to find various demonstrations. Some creators offer slow-motion breakdowns, while others provide tips for troubleshooting common issues. Mastering the magic circle takes practice, but it’s a crucial skill for any aspiring amigurumi artist. It provides a neat and professional start to your creations, avoiding the hole often left by traditional starting methods.
XVII. Crochet for Wearables: Beyond Basics
Transitioning from amigurumi to wearables requires understanding a few key concepts. While basic stitches remain the foundation, achieving a good fit and professional finish demands attention to detail. YouTube offers a wealth of tutorials specifically geared towards crochet garments and accessories.
Gauge swatches are paramount. Learning to create and read a gauge swatch – a small sample of your chosen stitch pattern – ensures your finished piece will be the correct size. Tutorials demonstrate how to measure your swatch and calculate adjustments needed for your pattern.
Blocking is another essential technique. This process involves wetting or steaming your finished crochet piece and shaping it to the desired dimensions. YouTube tutorials showcase various blocking methods, from pinning to steaming, and explain how blocking improves drape and overall appearance. Explore channels for guidance on yarn weight, hook size, and pattern selection for wearable projects.
XVIII. Gauge Swatch ― Ensuring Proper Sizing
Achieving the correct size in crochet wearables hinges on understanding gauge. A gauge swatch is a test square crocheted in the stitch pattern called for in your pattern, using the recommended yarn and hook. YouTube tutorials demonstrate how to create this crucial sample.
Why is gauge important? Because individual crocheters have different tension. Your stitches might be tighter or looser than the designer’s, impacting the final dimensions of your project. The swatch allows you to compare your stitch and row counts to those specified in the pattern.
How to measure? Tutorials show you how to accurately measure your swatch, typically over four inches, counting both stitches and rows. If your gauge doesn’t match, adjust your hook size – larger hook for looser gauge, smaller hook for tighter gauge – and repeat the swatch process until you achieve the correct gauge. YouTube channels offer visual guides to this process, making it easier to grasp. Don’t skip this step!
XIX. Blocking ― Finishing for Professional Results
Blocking is the secret to elevating your crochet projects from handmade to professional-looking. It’s the process of wetting or steaming your finished piece and shaping it to the desired dimensions. YouTube is an excellent resource for visual demonstrations of various blocking techniques.
Why block? Blocking evens out stitches, corrects distortions, and enhances the drape of the fabric. It’s particularly important for wearables like sweaters or shawls, ensuring a flattering fit. Different fibers require different blocking methods; acrylics are often blocked with steam, while wool can be wet-blocked.
How to block? Tutorials show you how to pin your crochet piece to a blocking board (or a towel-covered surface) in the desired shape, then gently steam or wet it. Allow it to dry completely before removing the pins; YouTube channels provide detailed instructions and tips for blocking specific stitch patterns and yarn types, ensuring a polished final product.
XX. Helpful Tips for Beginner Crocheters
Starting crochet can be exciting, but a few tips can make the learning process smoother! YouTube tutorials often emphasize the importance of using stitch markers, especially when you’re first learning. Place them in your first and last stitches of each row to easily identify them and avoid accidental increases or decreases.
Consistent stitch count is key. Regularly counting your stitches in each row ensures you maintain the correct shape and size of your project. It’s easy to lose track, so make it a habit! YouTube demonstrations often show how to visually check your work.
Don’t be afraid to rip it out! Mistakes happen. Acrylic yarn, like Caron One Pound, is forgiving and easy to unravel. YouTube channels demonstrate how to carefully remove stitches without damaging the yarn. Embrace the learning process and remember that practice makes perfect!
XXI. Using Stitch Markers for Accuracy
Stitch markers are invaluable tools for beginner crocheters, and many YouTube tutorials highlight their importance. These small plastic rings (or even loops of yarn!) help you keep track of important stitches, preventing errors that can quickly accumulate. Specifically, placing a stitch marker in the first and last stitch of each row is a fantastic habit to develop.
Why are they so helpful? They clearly delineate the beginning and end of your rows, making it easier to identify increases, decreases, or pattern repeats. YouTube demonstrations often show how stitch markers prevent accidental additions or omissions of stitches, ensuring your project maintains its intended shape.
Don’t limit yourself to row ends! Use them to mark specific stitches within a row, especially when following complex patterns. Many YouTube instructors use multiple markers to highlight key points. A basic Amazon hook kit often includes stitch markers, making it easy to get started!
XXII. Counting Stitches ― Maintaining Consistent Shape
Maintaining consistent stitch counts is crucial for successful crochet, and many YouTube tutorials emphasize this foundational skill. It’s incredibly easy to accidentally gain or lose stitches, especially as a beginner, leading to projects that are uneven or don’t fit as intended. Regularly counting your stitches in each row is a simple yet powerful way to avoid these issues.
How to do it effectively? After completing each row, take a moment to carefully count the stitches. Compare this number to the stitch count specified in your pattern or the previous row. YouTube videos often demonstrate techniques for visually identifying stitches, making the counting process easier.

Don’t be afraid to frog! (rip it, rip it!) If you discover a discrepancy, don’t hesitate to unravel your work back to the mistake and correct it. It’s far better to fix a small error early on than to continue with a flawed project. Many YouTube channels show how forgiving acrylic yarn is for ripping out mistakes!
XXIII. Recommended YouTube Channels & Tutorials
YouTube is a treasure trove of free crochet tutorials, perfect for beginners! ClubCrochet (https://youtube.com/c/ClubCrochet) offers a comprehensive range of lessons, from basic stitches to more complex projects. Their clear demonstrations and step-by-step instructions are ideal for visual learners.
For focused stitch tutorials, check out https://youtu.be/11iw-yBGm-k and https://youtu.be/aAxGTnVNJiE. These videos break down individual stitches, like the single crochet and double crochet, making them easy to understand and practice. Another excellent resource is a playlist from PLVfc07XdHHVx3Qiq9nyxthMFGN0UulG1L, offering a curated collection of beginner-friendly tutorials.
Don’t limit yourself! Explore different channels and instructors to find a teaching style that resonates with you. Many crocheters recommend searching for specific techniques or projects on YouTube to find targeted tutorials. Remember to adjust your hook size and yarn weight as demonstrated in these videos for optimal results.